
These experts helped us to
create our product content:
Vital POS Select Review
There are actually two options for Vital POS systems – the Vital Select X8 and the Vital Select E13/E15. (The only difference between the E13 and E15 is the size of the screen – 13” vs. 15”.) For the purposes of this review, I’ll refer to the E13, as that is the one I tested.
For some reason, all of the Vital equipment has multiple names. You may see the Vital Select X8 also called the E500 Smart Terminal. The E13/E15 may also be called the Elo POS. Despite the name differences, they are the same device. I'll refer to them as the Select X8 and E13, as those are the official names TSYS uses.
I had the opportunity to test the X8 and E13. Both systems use the same point of sale app and the Vital Back Office portal for management functions. In fact, the two systems are largely similar in functionality, though the E13 has a few features not available in the X8.
CardFellow does not receive compensation from Vital POS systems. However, CardFellow has a partnership with TSYS, the owner of Vital. We receive small commissions from TSYS if you sign up for their credit card processing services through the CardFellow marketplace. Read more about how CardFellow makes money.
Hardware
The right hardware for you depends on a few factors:
- Do you want to accept PIN debit cards?
- Do you need a built-in cash drawer?
- Would you prefer a larger screen?
If the answer to any of those is “yes,” you’ll want the Vital Select E13. Otherwise, the Vital Select X8 is a good choice. Both systems include the POS app with all functions, and the full Back Office.
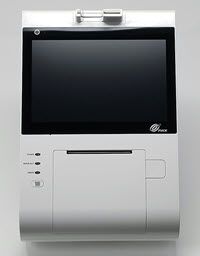
Vital POS - Select X8
Starting cost: $1,199
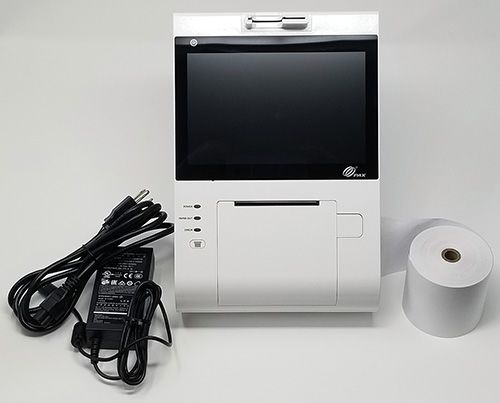
The Vital Select X8 with power cord and receipt paper.
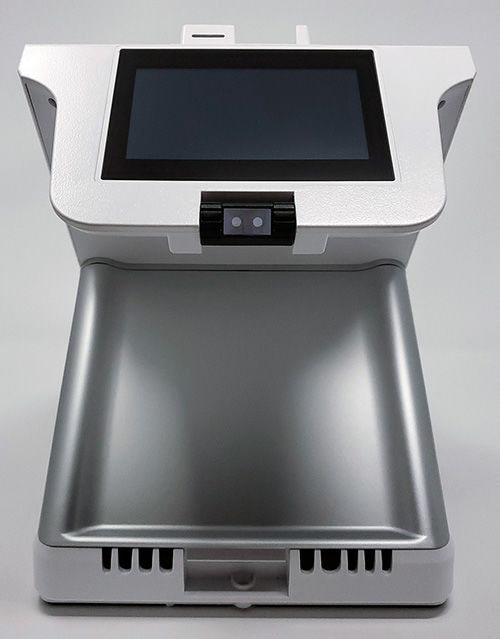
The Vital Select X8
The Select X8 offers almost all of the same functions as the E13, but in a more compact machine. It doesn’t include a cash drawer, but you can connect one if you’d like. The grey back panel on the machine is removable. That’s where you’ll be able to plug in ethernet or phone cables, cash drawer cables, and the power cord.
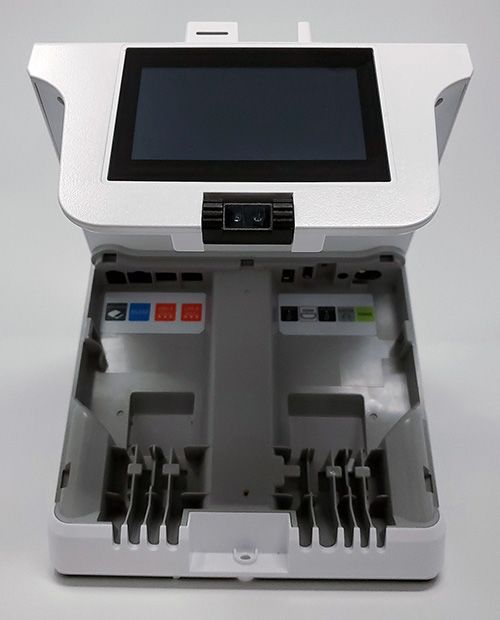
The Vital Select connections panel
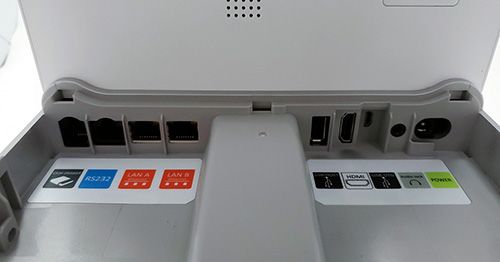
Connection panel close up
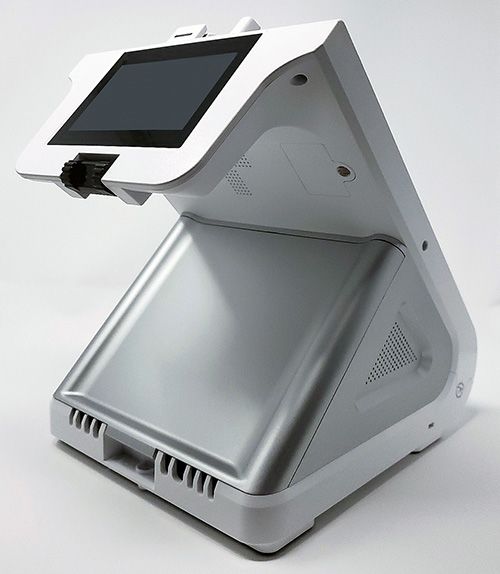
The machine also offers a customer-facing screen for displaying the price, accepting NFC (contactless) payments, and capturing customer signatures.
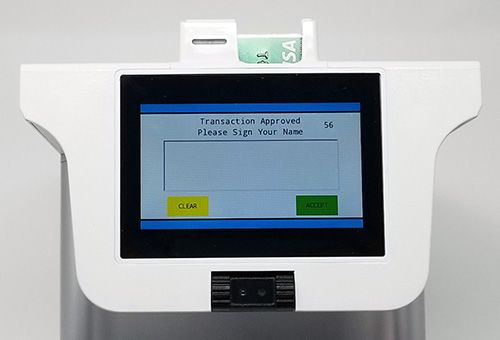
The X8 customer-facing signature capture screen
The X8 has a built-in receipt printer and a built-in barcode scanner. It can run on battery power, but some functions (like the printer) only work while plugged in. Ideally, you should only use the machine on battery power as a last resort.
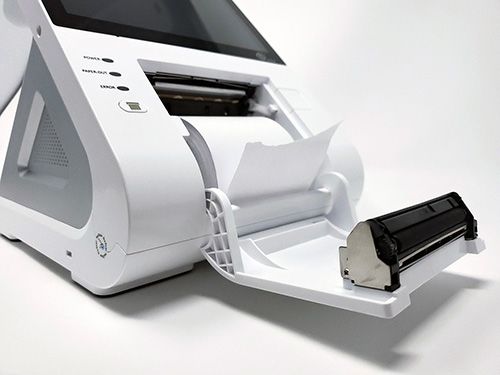
X8 built-in receipt printer
X8 built-in barcode scanner
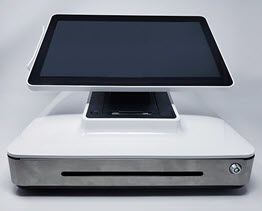
Vital POS – Select E13
Starting cost: $1,600
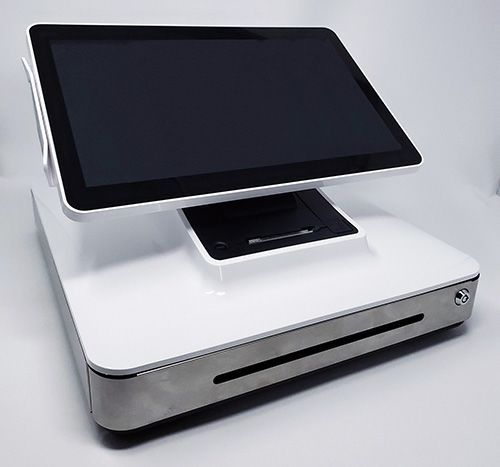
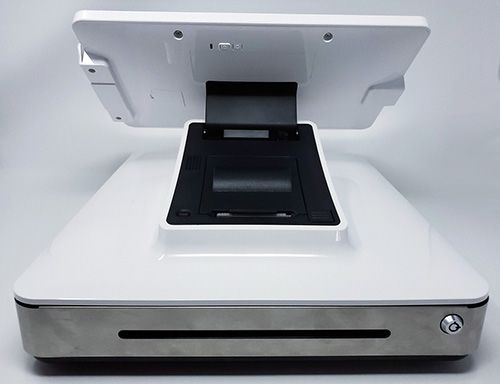
Vital Select E13 facing cashiers.
The E13 is the larger of the two Vital point of sale systems, partly due to the attached locking cash drawer and partly due to the tablet-sized screen. The tablet is on a swiveling stand that allows you to tip it to face your customer to collect signatures or allow them to input tips. When you tilt the screen to the customer, it will automatically flip the orientation so that everything is right side up.
Vital E13 tilted to face customers.
The built in receipt printer is on the top of the machine, facing the same side as the cash drawer. (That is, the cashier’s side.)
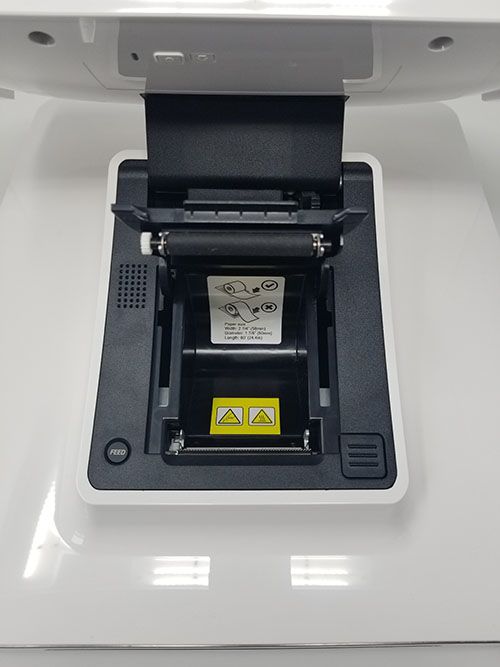
E13 with receipt printer open
The Select E13 comes with receipt paper to get you started. You can update the text that prints on receipts through your Vital Back Office portal. If you’d like the cash drawer to open upon printing a receipt, you can set that up (through the register settings) as well.
A minor quirk to be aware of: While the integrated cash drawer does lock, the keys to the cash drawer won’t actually open it; they will only lock or unlock it.
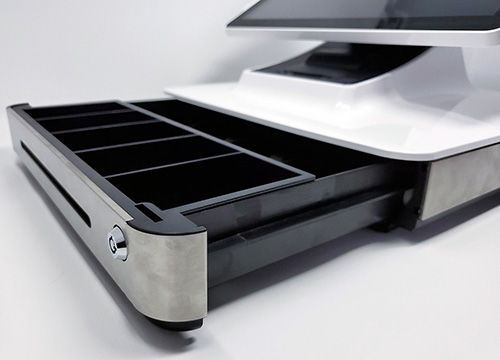
Vital E13 POS cash drawer
The drawer can be opened by pressing “no sale” in the sales screen if the signed in user has appropriate permissions to allow for the register to open on no sale. You can also set the drawer to open automatically upon completion of a transaction. If necessary, you can open the drawer manually using a small latch on the underside of the POS system.
The customer-facing side of the base includes a small screen that displays the purchase amount.
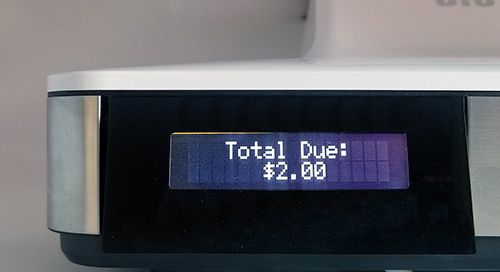
Vital Select E13 POS customer total screen
However, customers can also see the transaction total if you flip the screen to face them. It will be displayed when you collect a signature for a credit or signature debit transaction.
The E13 does not have a battery. If it is unplugged or the power goes out, it will not turn on.
Differences Between the Vital Select X8 and E13
As noted above, a physical difference between the two machines is size. The X8 is smaller, featuring an 8” main screen and a 4.5” customer-facing screen. The E13 has a larger main screen (13”) as well as a larger “base,” which is actually the built-in cash drawer.
|
|
|
|
|
Screen size |
8” |
13” |
|
Option to run on battery |
Yes |
No |
|
Built-in cash drawer |
No |
Yes |
|
Built-in barcode scanner |
Yes |
Yes |
|
Magstripe reader |
Built-in |
Built-in |
|
EMV chip reader |
Built-in |
Available with PAX PIN pad |
|
Contactless reader |
Built-in |
Available with PAX PIN pad |
|
Accept PIN debit |
No |
Yes, with PAX PIN pad |
Aside from physical size, the two machines are pretty similar. The only difference in accessories relates to PIN pads. You can connect a PIN pad to the E13 if you want to accept PIN debit cards or contactless (NFC) payments. The X8 does not support PIN entry.
Both systems support all the features of the Vital POS app and the Back Office portal.
Components of Vital POS Systems
With hardware explained, let’s move on to the features and functions of the systems. There are two “components” to Vital POS systems: the POS app and the Back Office portal. The POS app is where you’ll actually enter orders and process payments. The Back Office portal allows you to set up anything necessary for order entry (such listing your menu items or your store inventory for cashiers to search) as well as manage employee permissions, view reports, and set up taxes or discount information.
Let’s look at basic setup and the Back Office first, as that’s where you should start before taking payments.
Setting Up Your Vital Point of Sale
When you purchase an X8 or E13, you’ll have the option of a phone consultation with the Vital team to set up your machines. I opted for that training and the team scheduled a phone call for a few days later.
In the meantime, I decided to try setting up the machines myself. Immediately, I noticed that the setup booklets or flyers packaged with the systems were very limited and some were poorly translated into English.
However, Vital has a dedicated site for tech support (help.vitalpos.com) that provides extensive assistance, including screenshots and step-by-step instructions for various tasks. If you’re not sure how to do something, chances are you can find an explanation on the Vital help site. Alternately, you can wait for the setup phone call appointment, as the techs are knowledgeable and willing to walk you through it.
Despite the sparse setup instructions in the boxes, I was able to set up three of the five devices with minimal issues. (The devices I had trouble setting up myself were easily taken care of by the Vital team during my phone training and were related to having so many devices on my account.)
Since Vital runs on an Android operating system, it will likely feel familiar to you if you’ve ever used an Android phone.
Vital Back Office
The Vital Back Office portal allows you to manage multiple aspects of your business, including your inventory, sales screens, employee profiles, payment details, and more. It’s where you’ll want to start when you first get a new Vital POS system.
The Back Office solution is part of your TSYS merchant account when you purchase any Vital equipment and has a monthly fee that varies by equipment used. Some functions are only available with certain equipment. However, every feature is available on the Vital Select X8 and Vital Select E13 POS systems.
Vital Back Office is broken down into 5 main sections:
- Analytics
- Transactions
- Items
- Store Setup
- Staff
Each section has multiple features that allow you to manage all aspects of your POS system, transactions, and more.
One thing to be aware of (and I can’t stress this enough) is that you’ll need to sync your Vital device whenever you make changes. The key to smooth Vital operation is syncing. You don’t have to sync after every single change, but sync when you’re done making all of the updates / changes you’re making.
Analytics
The “Analytics” section is where you go for reports. Back Office provides sales summaries (including gross and net, sales by card type, and tax and refund summaries), profit margin details, comparisons with other time periods, and more.
The more detailed sales reporting allows you to drill down to view sales by day, hour, month, week, user, and register. You can even view sales as a calendar that also includes the weather and temperature, helping you spot any buying trends based on weather factors.
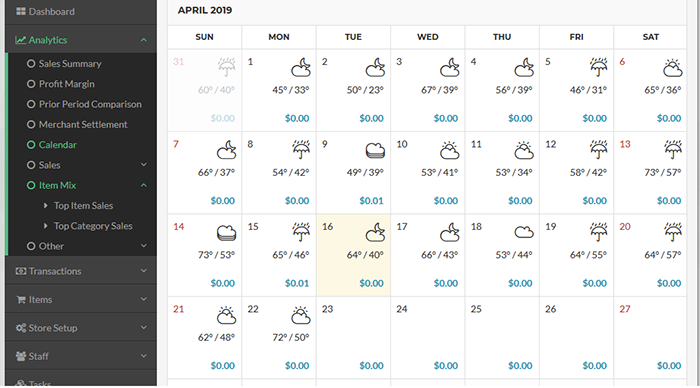
When you log in to Back Office, you’ll always land on the main dashboard, which shows quick summaries of sales and top items. But you can use the Analytics section to drill down for more details to get a better understanding of your best selling items and more.
Transactions
While Transactions can provide some of the same information as the Analytics section, it also provides an exportable list of your transactions. It allows for searching, so if you need to find a specific transaction, this is the screen you’ll need.

The Transactions section lets you view all transactions, individual batches, payment types, and any financial audits you’ve conducted.
Items
For retailers and restaurants, the Items screen is one of the most important. It’s Vital’s inventory management module, and it’s where you can set up your item catalog or menu. The items you set up here are what your cashiers / servers will see when they ring up orders.
It’s also one of the places where I initially did things incorrectly. I’ll explain what I did and what you should do instead so you can learn from my mistakes. Fortunately, even though I didn’t set things up in the optimal way initially, it’s fairly easy to make changes without deleting everything you’ve done and starting over. But you’ll save yourself time and frustration if you simply do it right from the start. To that end, it’s important to know that the different options actually mean.
Definitions
There are several terms used in the Items screen.
Item: An individual product, e.g. Iced tea.
The only required fields to add an item are name and price, but you can also include your cost (for margin reports), MSRP, item codes / models / part numbers, manufacturer details, item description, and whether the item should be taxed and if it’s eligible for discounts.
You can also select any “item alerts” that apply. Item alerts will pop up when a staff member selects that item, reminding them of any restrictions or notices. Alerts include age restrictions (e.g. “must be 21 to purchase”), dietary warnings (e.g. “may contain allergens”) or a special order note.
Active vs. Inactive Items
When you add an item to your Item Library, it will be marked “active” by default. You can mark an item inactive by unchecking that box at any time.
Marking an item inactive will remove it from the order entry screen that staff sees, but retains all of the pricing information and other details you’ve entered. Marking inactive is not the same as deleting an item, which will remove it from the system entirely. Mark items inactive if you’re out of stock or temporarily not selling the item. Delete them if they’re mistakes or you want to completely purge them from your system and records. (Note that if you’re looking at reports by item, that can cause difficulties. It’s often best to simply mark an item inactive if you have previously sold it and may need to view reports or information about that item.)
Category: The main group(s) to which an item belongs, e.g. Drinks.
By default, the Vital system includes an “All Items” category. However, items can belong to multiple categories and it’s often beneficial to create your own categories.
Subcategory: A more specific grouping under a main group, e.g. “Non-alcoholic” under the category “Drinks.”
Vital doesn’t set up any subcategories by default. Items can belong to multiple subcategories if relevant.
Modifier: A customer-specific adjustment or addition to an item.
For example, adding cheese to a hamburger. “Cheese” would be the modifier to the item “hamburger.” You’ll have the option to set a cost for modifiers as well. You may want to upcharge for cheese but not add a cost if a customer opts to skip the tomato.
Modifier Set: A group of related modifiers for an item.
For example, if your hamburger comes with mayonnaise, you may want a modifier for “hold the mayo.” But the customer may also want to add cheese, so that modifier should apply to the hamburger as well. In that case, you could create a modifier set such as “Burger Toppings” and add all of the modifiers that relate to your hamburger. If you group related modifiers, you’ll only need to apply the modifier set to an item to enable any of the modifications to that item.

Note: To bring up the modifier options for a particular item, you’ll need to add the item to an order, then click the item in the order summary on the right hand side of the screen. That will display any modifier options assigned to that item.
Screen Layout: If you want to show category groupings on the main order entry screen, you’ll need to set them up as screen layouts. Otherwise, you’ll only see the option “all items” which will list every active item in your item library.
If you don’t have many items, screen layouts may not be necessary. However, if you have more than a handful of items, sorting them by screen layout will allow for quicker staff entry.
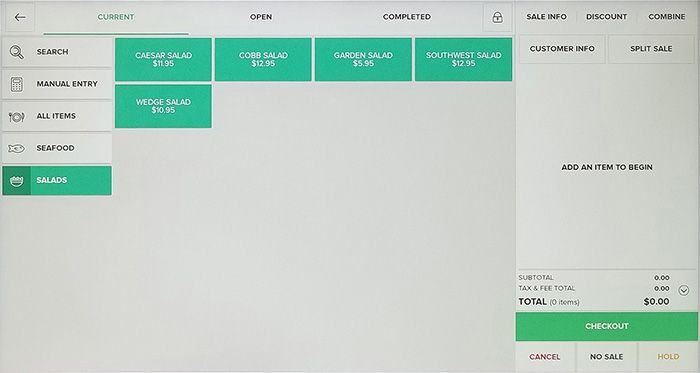
As you can see in the screenshot above, setting a screen layout of “Salads” would allow a server to quickly locate a particular salad without having to look through the full item list.
A retailer, on the other hand, may choose to set screen layouts by department, brand, clothing type, or other distinctive features. The POS system can automatically create your screen layouts from the categories and subcategories you create for consistency and faster setup.
Setting Up Items
When setting up your items library, work from largest to smallest. Meaning, set up your categories and subcategories first, then your screen layouts, and finally your individual items and modifiers.
The reason I suggest doing it this way is because the items screen will ask you if you want to assign the item to a category / subcategory / screen layout. If those aren’t set up yet, you’ll have to go back into the item later and add them (or even move the item to a subcategory if you originally place it under a different category) which creates extra work for no reason. (Guess who did it that way? Yup, me.)
Eager to try ringing up a sale, I entered a few times into the item library. Not yet familiar with screen layouts and categories, I didn’t assign the item to any groups. Later, I had to go back into each item I had added and manually move it to the appropriate category. Then I realized I hadn’t assigned any of the categories to the “All Items” main category, resulting in a situation where my “all items” screen on the POS didn’t bring up a single item! I had to enter items manually or search for the item.
Lesson learned – set up all of your categories and subcategories first, then add items to each relevant category.
Example:
If you run a shoe store, you might choose a structure such as:
Category – Women’s Shoes.
Subcategories – Heels, Boots, Sandals, Sneakers, Flats
Screen Layouts – Women’s Shoes, Men’s Shoes, Kids’ Shoes, Sport Shoes
From there, you would add the individual shoes to the item library, setting pricing, names, SKUs, and any other info that you want to include. You can then assign it to the appropriate category, subcategory, and screen layout.
Note that Vital also includes an option to automatically create screen layouts. If you choose that option, the system will create a layout for each category and subcategory that has at least one item assigned.
Once you add items, remember to sync every Vital device so it has the most updated inventory. If you don’t sync your device, users who sign in won’t see any changes or updates. It’s good practice to get in the habit of syncing whenever you’re done making a change or series of changes.
Store Setup
The Store Setup section contains the more administrative tasks. It’s where you can update your business contact info, customize the receipts customers get, and assign kitchen printers or table identifiers.
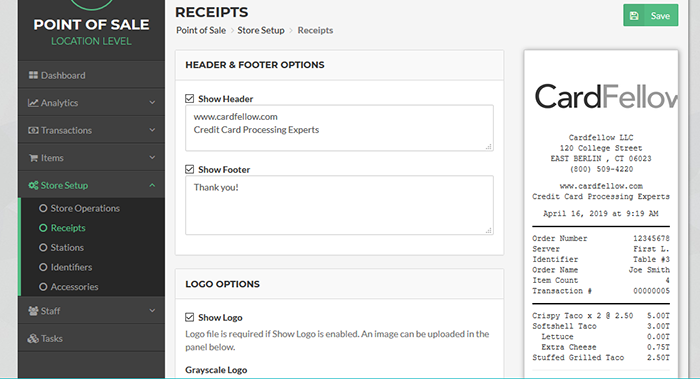
In the screenshot above, you can see the options to add a header and footer to receipts. You can even add a logo for consistent branding. Vital suggests using a greyscale or black and white logo and provides recommended dimensions and resolution. However, I had difficulty with a greyscale logo – only the black part would print. Switching to a solid black logo resolved that issue. If your dimensions are off, the logo may be cut off, so be sure you’re following the logo specifications.
Staff
The Staff section is another part of administrative functions. This is where you can add staff members so that they have access to the POS, Back Office, or both, if necessary. As the name implies, the Staff category includes features related to managing employees. There are two main functions: groups and roles.
Groups
“Groups” lets you assign users in the same position to a group and set permissions for access to various functions at the group level. (Meaning, you simply set permissions once – for the group overall – and any employees you add to that group will have the group’s permissions.)
Any of the settings you define by group will apply to all users in that group. Vital gives you the option to notify group members of specific activity, set permissions for which functions they can access, and control which reports or information they’re able to view.
Group permissions are a place where Vital offers a lot of options. You can set staff permissions as specifically or as generally as you’d like. The system splits permissions into several categories, each with multiple functions. The categories include item library, management, register, transactions, security, and store. You can choose whether to allow permission to all of the functions, none of the functions, or specific functions.
For example, here’s a screenshot showing the Transactions permission category. It includes functions such as issuing full refunds, allowing users to close batches, and more. You can elect to allow or not allow individual features, or permit / restrict the entire category.

By default, Vital offers 4 groups: admin, manager, server, and cashier. However, you can add or delete any groups you’d like. You can also change permissions at any time by editing the group. (If you change permissions, remember to sync!)
It’s a good idea to make sure that you’ve created your groups and set the permissions for that group before you begin adding individual users. That will help cut down on the possibility that a user has access to functions that you’d like restricted. (Such as the ability to offer refunds without management approval.)
Individual users’ login screens will reflect only the options to which they’re authorized to use. For example, this user is not permitted management or administrative functions. Therefore, when they sign in, they’re only provided limited options.
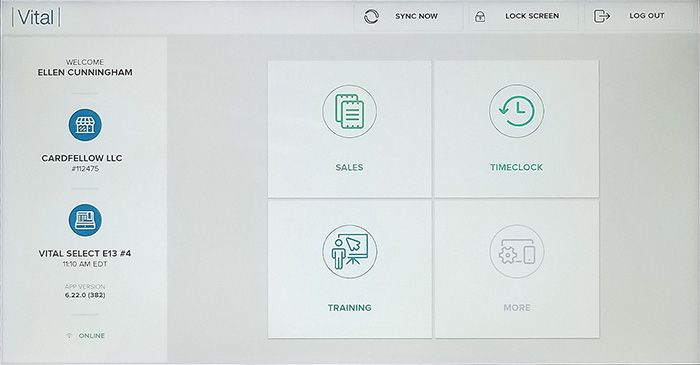
Limited function user menu
You can add users to more than one group or move them between groups at any time. If a user is in multiple groups, they’ll have access to all of the functions that those group members can access.
Roles
“Roles” is a function of the timeclock component of Vital. You’ll enter the name of a job in your business, choose whether the position is hourly or salaried, and whether it accepts tips. it’s a good idea to use role names that relate to groups you want that role associate with. For example, you may have roles of “daytime server” and “weekend server,” with both assigned to the group “servers.”
Once you’ve defined roles, you can assign them to individual employees. You’ll then be able to add the employee’s pay rate. Pay rates are specific to employees – they do not apply to roles overall.
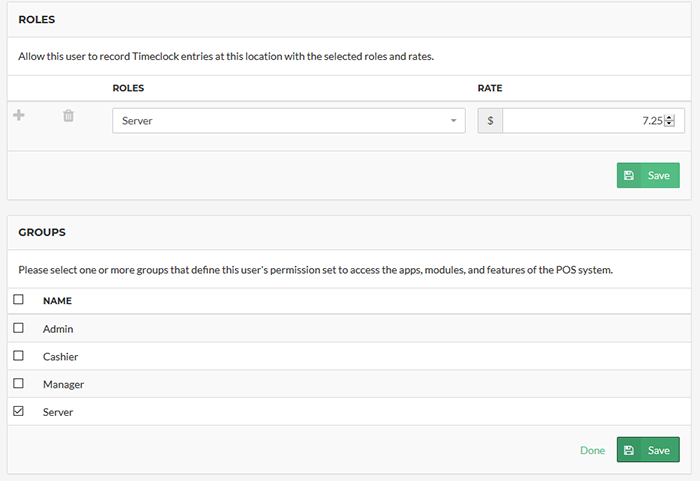
As you may have guessed from the plus sign in the screenshot above, you can add additional roles to a single user. This option comes in handy for employees that perform work in one role part time and another role the rest of the time, with different pay rates for each role. Setting up the user with multiple roles allows them to clock in under the correct role.
Timeclock and Labor Tracking
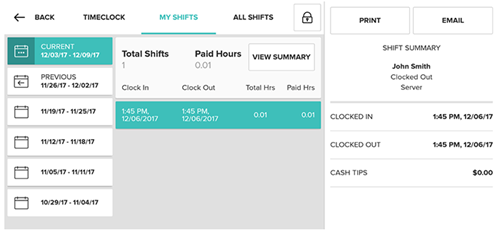
The Vital system also supports staff timeclock on compatible devices. The Select POS systems once again support all functions, which includes individual PIN logins for each employee, access that can be restricted by location, time clock reports, shift management, printable or emailable timecards, custom pay periods, and overtime management.
The timeclock function lets staff punch in and out right on the POS system. It also includes an option to record breaks.
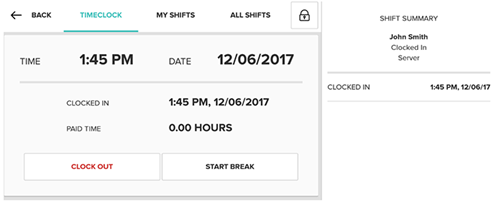
It also notes when the shift started and how long the employee has been on the clock/getting paid. Once clocked in, the employee can also navigate to the "my shifts" tab to check details on their current, previous, and upcoming shifts.
Other equipment in the Vital line (including the Mobile and Plus X5) does not support an employee timeclock. If that feature is important to you, you’ll need to use one of the Select POS systems.
Vital POS App
The point of sale app is where you conduct sales and process payments. When you sign in as an administrator, you’ll see a screen with 7 choices (sales, management, reporting, admin, items, training, and more) but only Sales and Management deal with the day to day POS functions.
Reporting, Admin, and Items all open the Back Office portal, while Training is simply a training mode you can use to familiarize yourself or staff with the POS. The “More” option gives you options for contacting customer support and for accessing settings for this particular register. (Staff can be restricted from accessing settings.)
Let’s go over the “sales” and “management” POS functions.
Sales
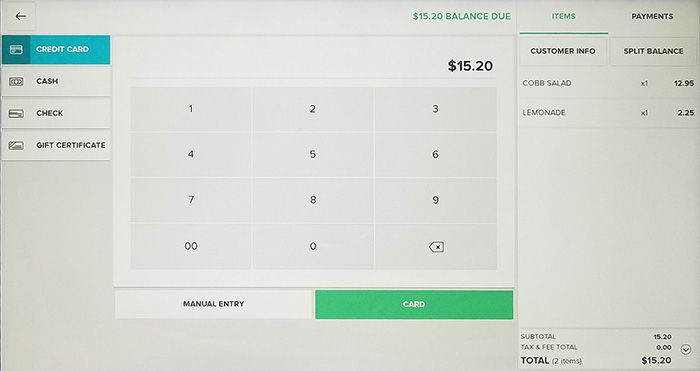
The sales screen is where you, well, enter sales. After you’ve opened the register / batch for the day, you can enter sales by searching for items you’ve set up in your inventory, scanning barcodes, or manually entering a new item. Once you’ve located, scanned, or hand entered the item, you’ll simply add it to the order and press “checkout” whenever you’re ready to complete the sale.
Both the X8 and E13 allow you to accept credit and debit cards, cash, and checks. When you’re at the checkout screen, the payment methods are listed on the left hand side. All “types” of card payments, including credit and debit, magstripe, contactless, or EMV chip, are simply under the “card” payment method. The checkout screen is also where you’ll see the option for “split balance.”
When you click “split balance” you’ll be given the choice of how many ways to split the remaining total.
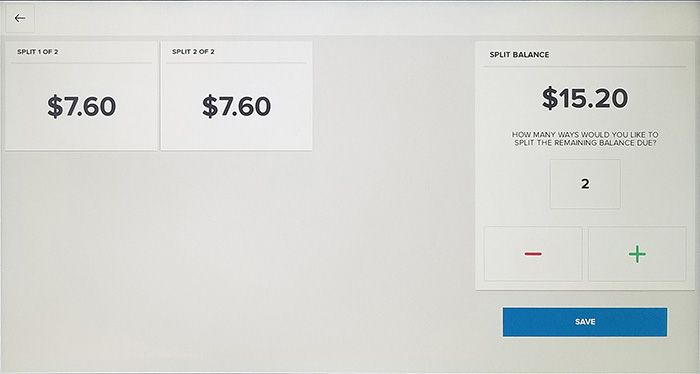
From there, you can take payments for the split payment.
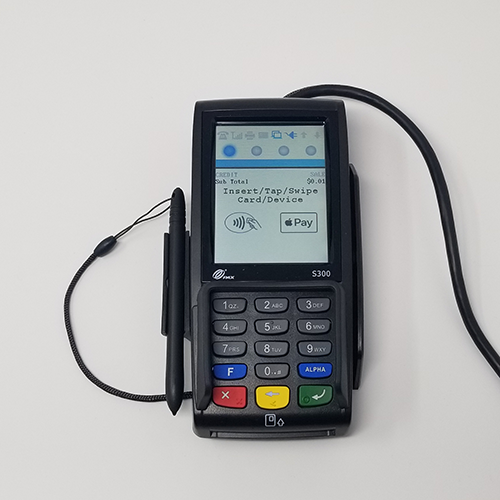
Keep in mind that only the E13 lets you connect a PIN pad if you want to accept PIN debit transactions. The E13 also requires the PAX PIN pad for PIN debit transactions, EMV chip card transactions, and contactless payments like Apple Pay. Only a magstripe reader comes built-in on the E13. If you have the PAX S300 connected to the E13, the screen will prompt you to insert the card (or tap a smartphone) to the PIN pad.
By contrast, the X8 has a built-in reader for magstripe, EMV chip card, and contactless payments. You won’t need a separate device for those. The reader is located at the top of the customer-facing screen, as seen in the image below.

PIN Debit
If you’re using an E13 and want to enable PIN authorization for debit cards, you’ll need the PAX S300 PIN pad. The device connects to the E13 via USB port, but also needs its own ethernet connection or phone line. (Meaning you’ll have to have at least two available ethernet ports or phone lines – one for the E13 system itself and one for the S300.) The PAX device has a cord with three cords that branch off.
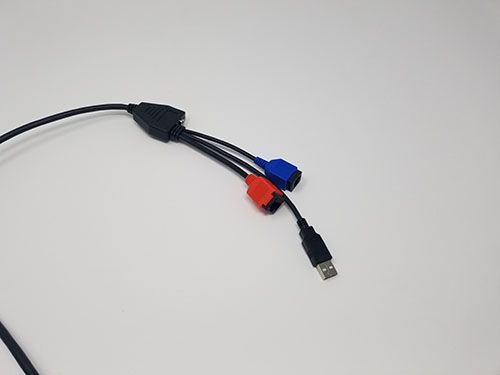
This is one of the places that tripped me up in setting up the devices prior to Vital team support. Everything appears to work if you connect an Ethernet cable to the S300 and then connect the USB to the E13. However, when you go to actually process a payment, it will not work unless both devices have an ethernet connection.
Cash Payment
When you accept a cash payment using the E13, you can choose to have the register open automatically when you enter the amount of cash received.
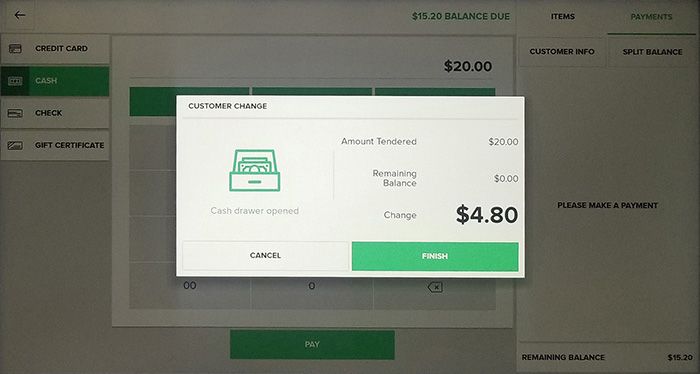
The screen will tell you that the drawer has opened and prompt you to click “finish transaction” to indicate you’re done handling change and processing the sale.
Taxes
The X8 and E13 support customizable taxing. You can set multiple tax rates, tax rates for different items, and even multi-store taxes. You can also exempt certain orders from tax, and view reports of tax-exempt sales.
On items that you enter manually, you’ll have the option to apply tax or you can set the system so that tax will apply automatically.
Refunds
On the Vital Select systems, refunds can be quickly processed right from the Sales screen. You’ll navigate to the “Completed” tab to locate the transaction that you’re refunding and select either “full refund” or “refund items” in the bottom right corner of the screen. Choosing “refund items” allows you to select only particular items to refund, while “full refund” returns the entire original transaction amount.
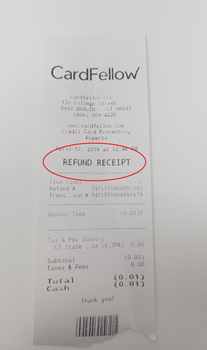
You can print or email a receipt for a refund just like you can for a sale, but it will clearly specify that it’s a refund receipt.
Voids vs. Refunds
If you haven’t closed out the batch that contains the transaction you’re refunding, it’s called a void. Voids don’t require swiping the original credit card used in the transaction.
However, the Vital team explained that if you’ve already closed the batch for the transaction that you’re attempting to refund, you will need the original credit card used in the transaction. If you don’t have it, you’ll need to contact Vital customer service for assistance manually refunding the transaction.
That said, I did find that when I attempted to refund a transaction with the PAX S300 card reader disconnected, the register initially gave me an error but asked if I wanted to proceed with a cash refund. I was able to complete the refund without the original credit card.
Discounts
The Discounts option allows you to set recurring discounts, such as military, senior, or student discounts. You can choose whether the discount is a percentage off or a dollar amount off the purchase price of either individual items or the customer’s entire purchase.
Batching
By default, the Vital POS system is set for manually batching. That means that you’ll need to close out your batch in order to send transactions to your credit card processor. You will not receive credit card payments until transactions are officially batched, allowing them to be processed. The “close batch” function is part of the “end of day” tab, available to any users with the appropriate permissions.
Vital does have options to sent up auto-batching, which you can discuss with the training team on your setup phone call. However, one things to keep in mind is that gratuities can affect the auto-batch process. Vital has options for both “retail” tipping (gratuities that are left at the time the card is run) and “restaurant” tipping (gratuities manually adjusted to a transaction later.) It’s important to get set up with the correct tipping version for your business.
Vital POS Costs
The Vital POS system typically start at $1,199 for the X8 and $1,600 for the E13 with the PAX S300 PIN pad. The larger screen E15 with PAX starts around $1,899. Optional Bluetooth printers start around $450.
|
|
Starting Cost |
|
Vital Select X8 |
$1,199 |
|
Vital Select X8 with cash drawer |
$1,299 |
|
Vital Select E13 with PAX S300 PIN Pad |
$1,600 |
|
Vital Select E15 with PAX S300 PIN Pad |
$1,899 |
|
Bluetooth printer (optional) |
$450 |
Optional accessories (such as a cash drawer for the X8, or kitchen printers) cost extra. The hardware cost is separate from the cost for credit card processing, which will be set by your processor.
Keep in mind that these prices are the starting costs. Your processor may charge more or less depending on other terms of your deal and options you select.
Vital Back Office and App Costs
In addition to the one-time hardware costs, you’ll pay a monthly software fee, which covers both the Vital Back Office and POS app. The software fee varies depending on the device(s) you use.
The monthly software fee for the Vital Select typically starts at $29.99. However, it can be more or less at your processor’s discretion.
Credit Card Processing with the Vital Select POS systems
Both the Vital X8 and Vital E13 only work with TSYS-compatible credit card processors. Fortunately, there are many different companies that can offer the Vital POS system.
However, it’s important to note that when you purchase the X8 or E13, you can only use it with the processor from whom you originally purchase it. Vital systems cannot be reprogrammed. That means it’s a good idea to make sure that you have a good deal on processing and plan to stick with your processor for a while.
Vital POS Credit Card Processors
Both the corporate TSYS Merchant Services and independent TSYS-compatible processing companies work with CardFellow. That means that we can help you secure the best rates and great customer service if you’re interested in a Vital POS system for your business.
CardFellow members receive industry-leading low costs and include protections not readily available in the open market. (Including a lifetime rate lock and independent statement monitoring to ensure you’re paying as little as possible.)
Not a member yet? It’s free and private. Fill out our two-minute signup form to get started and receive access to CardFellow-exclusive member pricing.
Product Features
Selective: TSYS
POS Systems
- Mobile device management
- Tableside Ordering
- Tableside Payment Processing
- Patron Online Food Ordering
- Gift cards and customer loyalty tracking
- Marketing metrics
- Inventory management
- Sales reports
- Employee tracking & management
- Payroll metrics
- Quickbooks data export
- PayPal acceptance
- Integrated CRM (customer relationship management)
- Windows-based system
- iPad-Based System
- Android-Based System
- Bar Code Scanners
- Card Readers
- Cash Drawers
- Receipt Printers
- Customer Displays
- Kitchen Printers & Monitors
- Checkout Scales
- Portable Receipt Printers
