
These experts helped us to
create our product content:
Vital Mobile Review
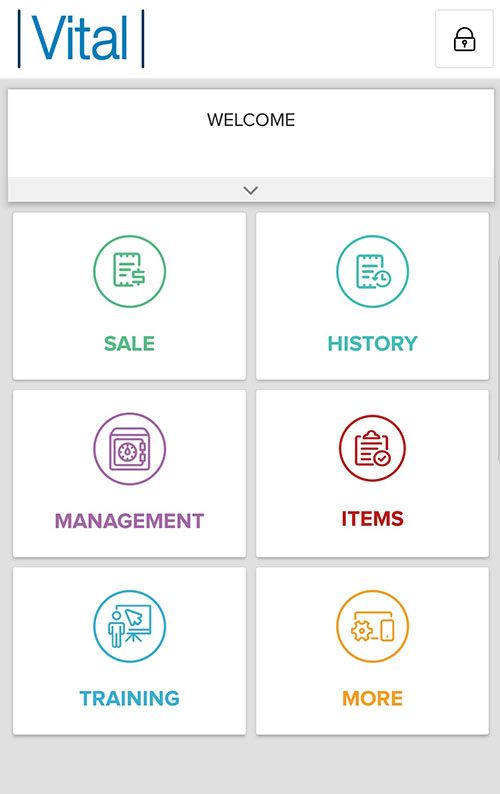
TSYS’s Vital Mobile app and card readers allow you to take payments from almost anywhere using your smartphone.
The app allows for multiple users on one merchant account, meaning that all of your staff can log in to place orders and accept payments under their own IDs. That’s great for letting you see who rung up which order, gave discounts, or sold the most items.
Like all mobile payment options, the Vital Mobile has fewer features than a full point of sale system. However, it does provide features for payment acceptance, employee management, and inventory.
Need a full POS system instead? Check out the Vital Select POS system.
I had the chance to test the Vital Mobile on an Android device, but it’s also compatible with Apple smartphones and tablets. Included screenshots show the Android version; the app for Apple devices may look a little different.
Setting up the Vital Mobile
To use Vital Mobile on your smartphone, you’ll need to download the app for your device. You’ll also need a merchant account with a compatible credit card processor. TSYS Merchant Solutions owns the Vital brand, so the devices only work with TSYS or a TSYS-compatible processor. Fortunately, there are many processing companies that fit the bill and can offer Vital equipment.
When you purchase a Vital device, you have the option of working with the Vital team by phone for training. If you’re not comfortable with setting up the app or inventory yourself, or if you just want confirmation on how to proceed, the training is a great option.
Some tech-savvy users may find that it’s not necessary to go through the training. You can always call the tech support team at a later date if you do run into an issue.
App Troubleshooting
I had the opportunity to test all of the Vital equipment. The Mobile was one of the last devices I tried, and as such, I had already used all of my register “seats.” That means that when I tried to sign in to the Mobile app on a compatible smartphone, I got an error message.
Fortunately, it was easy to resolve with the Vital support team. If you’re only using one or two Vital devices, you likely won’t even run into this issue. If you do, just be aware that you won’t be able to fix it yourself. Vital will have to enable another register “seat” for you.
Vital Card Reader
If you decide to use a card reader with the mobile app, you’ll need to charge it first. The reader comes with a USB cord for charging.

Vital Mobile with USB charging cord
The reader has several indicator lights, some for the battery status, the Bluetooth pairing status, and transaction indicators. When the battery is fully charged, you’ll see a solid red light next to the mini USB charging port, pictured:

Mini USB charging port and battery status indicator light
When the battery is low or charging, you’ll see a flashing red light instead of a solid light.
When the reader is ready to pair via Bluetooth, you’ll see a flashing blue light on the opposite side of the reader, next to the power button, pictured.
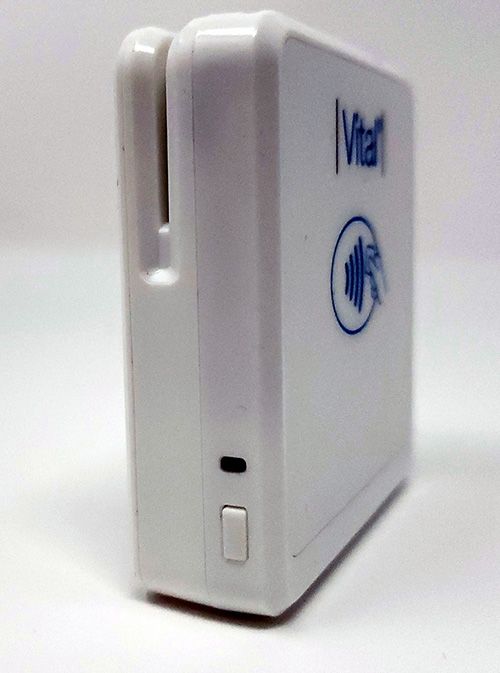
Power button and Bluetooth connection status light
When it’s connected, you’ll see a solid blue light.
The lights will also flash during transactions, with different lights indicating either different types of transactions or errors during the payment.

Vital Mobile indicator lights
For example, a contactless (NFC) transaction will cause all four light indicators to blink. During a chip transaction, the reader will display a blue light to indicate the card can be dipped and will show a blue light again when it’s time to remove the card. If there’s an error during a transaction, you’ll see a red light at the top.
Now that I’ve covered the basics of the reader, let’s take a look at the app and back office portal.
Vital Mobile App and Portal
Mobile POS apps typically have fewer features than full point of sale systems, and that’s true of the Vital Mobile. However, the app still includes access to Vital’s Back Office portal, which includes helpful features that increase the functionality of the system.
It’s a good idea to familiarize yourself with Back Office before taking payments. Back Office is where you can set up your item catalog or menu, restrict employee access to certain functions, and access reports. The POS app is where you’ll actually run sales or view items. Think of Back Office as the administrative and management side and the POS app as the day-to-day staff side.
Back Office
All of the Vital devices use the Back Office portal for reporting, setting up inventory, and managing administrative tasks. However, some features are not available with the Vital Mobile. Additionally, the Back Office will look a little different on your mobile device, as menus are collapsed to be more mobile-friendly.
If you use multiple Vital devices on one merchant account, they will all be able to access the same Back Office account, and changes made from one device can be pushed to all devices. Whenever you make a change, you’ll need to sync all connected Vital devices. Syncing is crucial to keeping your devices up to date and ensuring smooth operation. Remember to sync any time you make an update or a change so that your staff will have the most accurate item catalog / menu, permissions, etc.
In this Vital Mobile review, we’ll note any features that are technically available with either Back Office or the Vital POS App but that will not work with Mobile. That will help you determine if you need one of the other Vital solutions.
Feature-wise, Vital Mobile provides you with a few main “categories” of functions: Items, Payments, and Employee Management.
Items
As the name implies, “Items” is where you’ll list items that you sell. The Item library functions as either your item catalog (for retailers) or your menu (for restaurants.) It can also be your “services” offered if you run a service-based business.
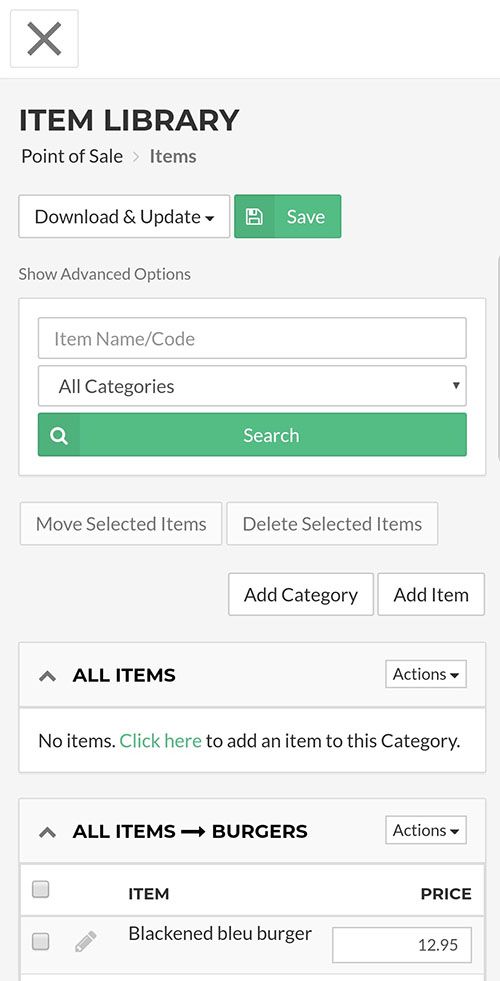
With Vital Mobile, you can enter items individually or import your existing inventory spreadsheet to populate your item screen. If you have a lot of items, it’s a good idea to import rather than spending time adding each item individually.
However, with either method, you’ll be able to sort items into categories and subcategories, set selling price and cost, and include a description of the item. You’ll also have access to top-selling item reports.
Categories and Subcategories
When populating your item catalog, you can save yourself some time by setting up categories, then subcategories, then individual items. I did it the other way – adding an individual item in my eagerness to ring up a test sale. After I added a few more items (glossing over the options to add the item to categories) I realized I had created more work for myself.
What I had done was create items that weren’t grouped in a logical way – they were just lumped together under the default “all items” heading. That meant it would take longer to locate a particular item than if I could first limit the selection to related items.
Fortunately, it’s an easy fix – you can simply edit the item using the green “pencil” icon, and assign it to the proper categories. However, I had to do that individually with each item I’d added. If I had created my categories and subcategories first, I would have been able to assign them item to the appropriate group when I entered the item the first time.
Lesson learned: when you’re setting up your item catalog (or restaurant menu) think about your item structure. Work from largest (categories) to smallest (items) and group similar items together.
All Vital solutions let you assign a color and an icon to categories. In the example below, I’ve used the “restaurant” icon set, which lets me choose from a variety of restaurant-related icons to use as a visual symbol of that category.

While I chose a restaurant icon set for illustration purposes, Vital offers several icon sets, including:
- Apparel and Accessories
- Electronics, Appliances, and Kitchen
- Furniture, Tools, and Auto
- Health, Pet, and Miscellaneous
- Restaurant
- Sports, Toys, and Baby
Adding an icon to categories is required, so it’s a good idea to find one that closely matches the category. Fortunately, there are multiple icons under each icon set. Here’s a screenshot with just a few of the icons available from some of the sets.

Vital Mobile icon sets
Once you have created categories, you can also choose whether those categories will be viewable in the app as a way to narrow down items. Vital refers to that function as “screen layouts.” If you don’t set screen layouts, you won’t be able to quickly toggle between categories. I’ll address this more in the POS app section later in this review.
Item Limitations
While the Mobile provides enough inventory management functions for many small businesses, there are some things it can’t do. Specifically, you can’t track quantities, look up inventory across multiple store locations, set low item alerts, or record physical counts. If you need any of those features, you’ll want to add the Vital Plus X5 or Vital Select POS systems.
Keep in mind that you can use multiple Vital devices with one merchant account. If you add a POS system, you can still use the Vital Mobile on the go, for tableside order entry, or for retail store line-busting. You’ll be able to perform the functions listed above on the POS system and still have the benefits of the Mobile system.
Payments
For back office purposes, the Payments functions let you set and edit various components related to payment, such as taxes and discounts. If you’re in a state with sales tax, you can configure your system to automatically add that tax to purchases.
Discounts
Do you offer student, military, or senior discounts? Or perhaps an order took a little longer than it should have, and you’d like to provide your customer with a discount for the inconvenience?
Using the Vital Mobile, you can create discounts manually, as needed, for a customer.
However, you cannot create / save discounts for entire orders or items. You’ll need to create the discount each time you want to apply it. For discounts that you can program for faster entry, you’ll need one of the other Vital systems: the Plus X5, Select X8, or Select E13/E15.
Taxes
There are two beneficial tax features in the Vital Mobile solution: multiple tax rates by item, and tax reporting. The multiple tax rates by item feature lets you set as many different tax rates as may apply. That helps speed up the checkout process.
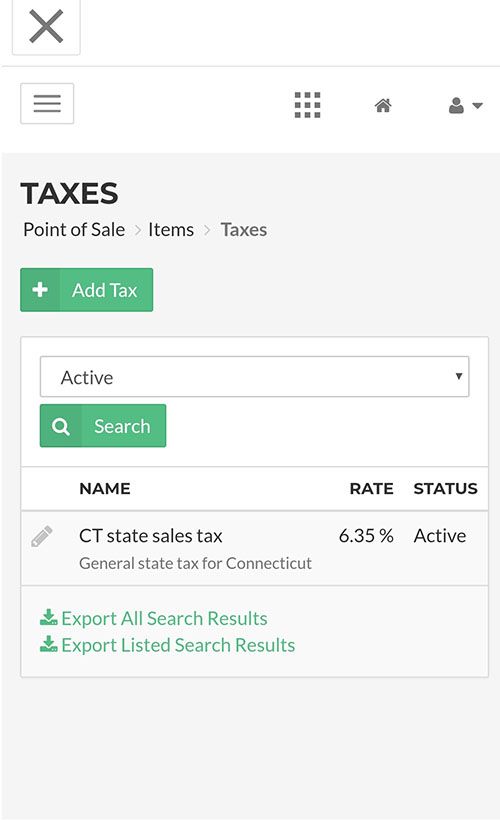
Vital Mobile tax rate example
Adding a tax is as simple as naming it, entering the tax rate, and providing a description so you can identify the tax later. Keep in mind that taxes do not change automatically. If your state raises sales tax, you’d need to manually update that in your Vital Back Office. (And then sync your devices!)
The tax reports function lets you easily see what you’ve collected in taxes. However, the Mobile solution does not let you set multi-store taxes or enable tax-exempt ordering. If you need those functions, consider one of the other Vital solutions.
Employee Management
The employee management module lets you enable PIN login for employees as well as enabling or restricting particular functions for individual users. You can set business “groups” and assign users to specific groups.
A cashier won’t need access to all the same functions as an assistant manager, for example. So, you can configure employee access so that managers can have access to functions like performing refunds while restricting cashiers to the more basic order entry and checkout features.
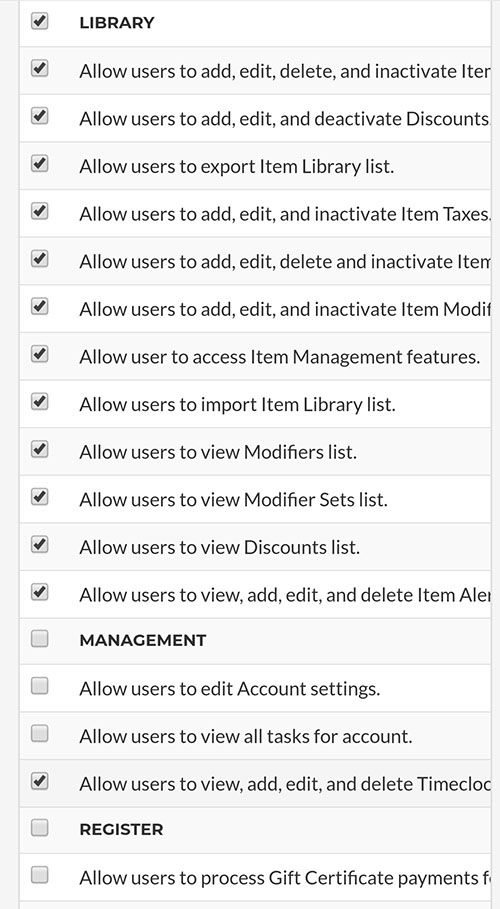
Vital permissions list
The Vital Mobile does not offer some of the more advanced employee management functions that are available in the full Select POS system. For example, the E13 and E15 POS systems support employee timeclock, shift recording, printable timecards, custom pay periods, and wage calculation, including overtime wages.
POS App
The Vital POS app is where you’ll actually ring in orders and process payments. From the app, you can access your item library / menu to quickly add items to a customer’s order. Alternately, you can scan barcodes for packaged items.
Your items will be color coded in the “All Items” screen, or you can scroll through to locate particular “screen layouts.” As I noted above, Vital gives you the option of viewing categories (and therefore the items in that category) separately. These “screen layouts” make it easier to locate an item, as it will limit the items to only what’s assigned to that category.
For example, here’s the “All Items” screen. While items are color coded according to their category, it’s still a mix of different items: seafood, burgers, salads, drinks.

Vital Mobile “All Items” screen
With “screen layouts” set up to match categories, I can tap the arrows on the side of the category name to switch between different categories. When I do that, only the items in that category appear.
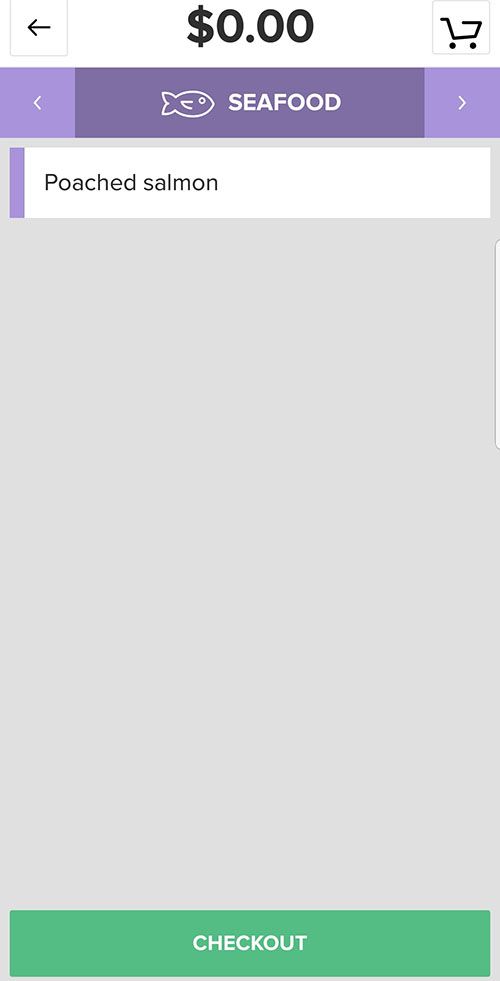
Vital Mobile screen layout example
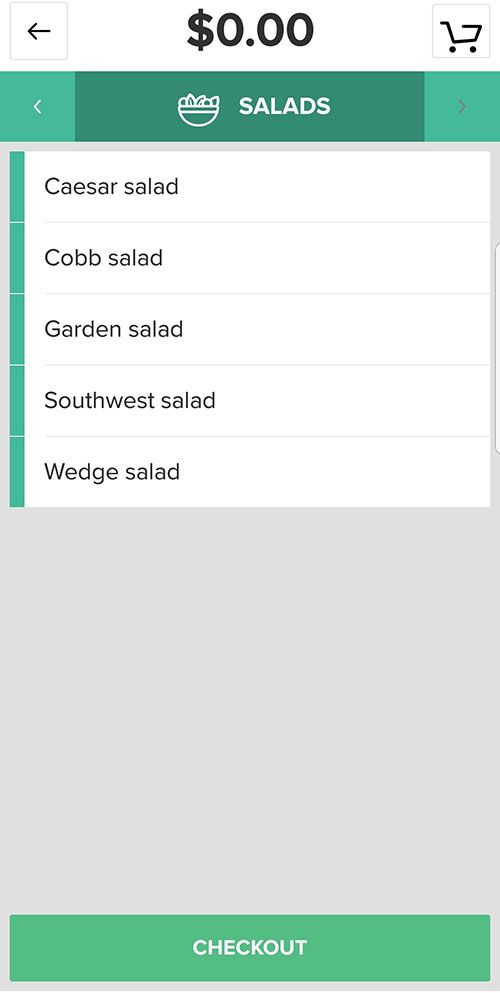
Vital Mobile screen layout narrows down items
Businesses with extensive menus or inventory will find the screen layout function beneficial for faster or entry or checkout.
Payment Types
The Vital Mobile, like all Vital devices, allows you to accept multiple forms of payment. You can take credit and debit cards, cash, or contactless payments (if you use the C4 NFC-enabled reader.) If you accept debit cards, customers will authorize the transaction with a signature. The Vital Mobile does not support PIN entry for debit cards. (If you require PIN debit entry, the only Vital devices that support it are the Vital Select E13 or E15.)
When you click “checkout” to complete a transaction, you’ll land on the credit card entry screen by default. There, you can either choose to run the card, enter it manually, or use the side arrows to navigate instead to cash payment.
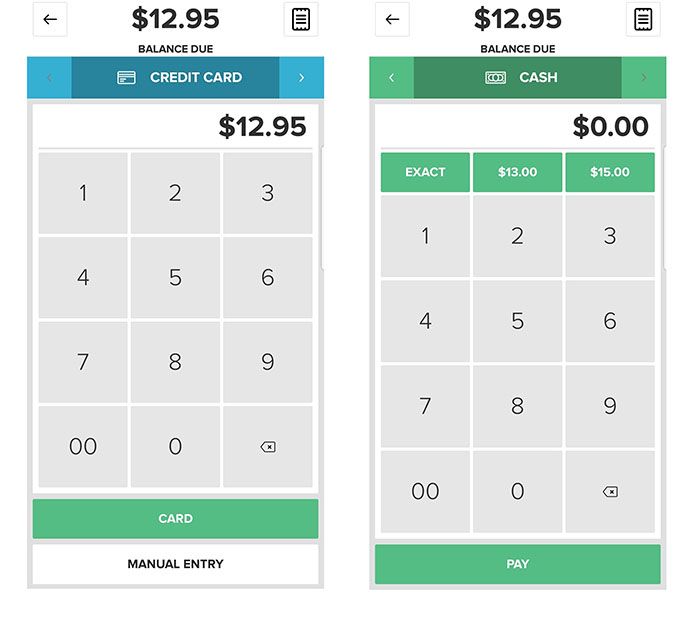
Keep in mind that while Vital Mobile allows you to manually enter a credit card, doing so will cost you more. Swiped / dipped / tapped payments are considered safer and less risky than keyed cards, and thus have lower fees. You may not always be able to avoid keying in a card, but in general, if you can swipe / dip / tap, you should.
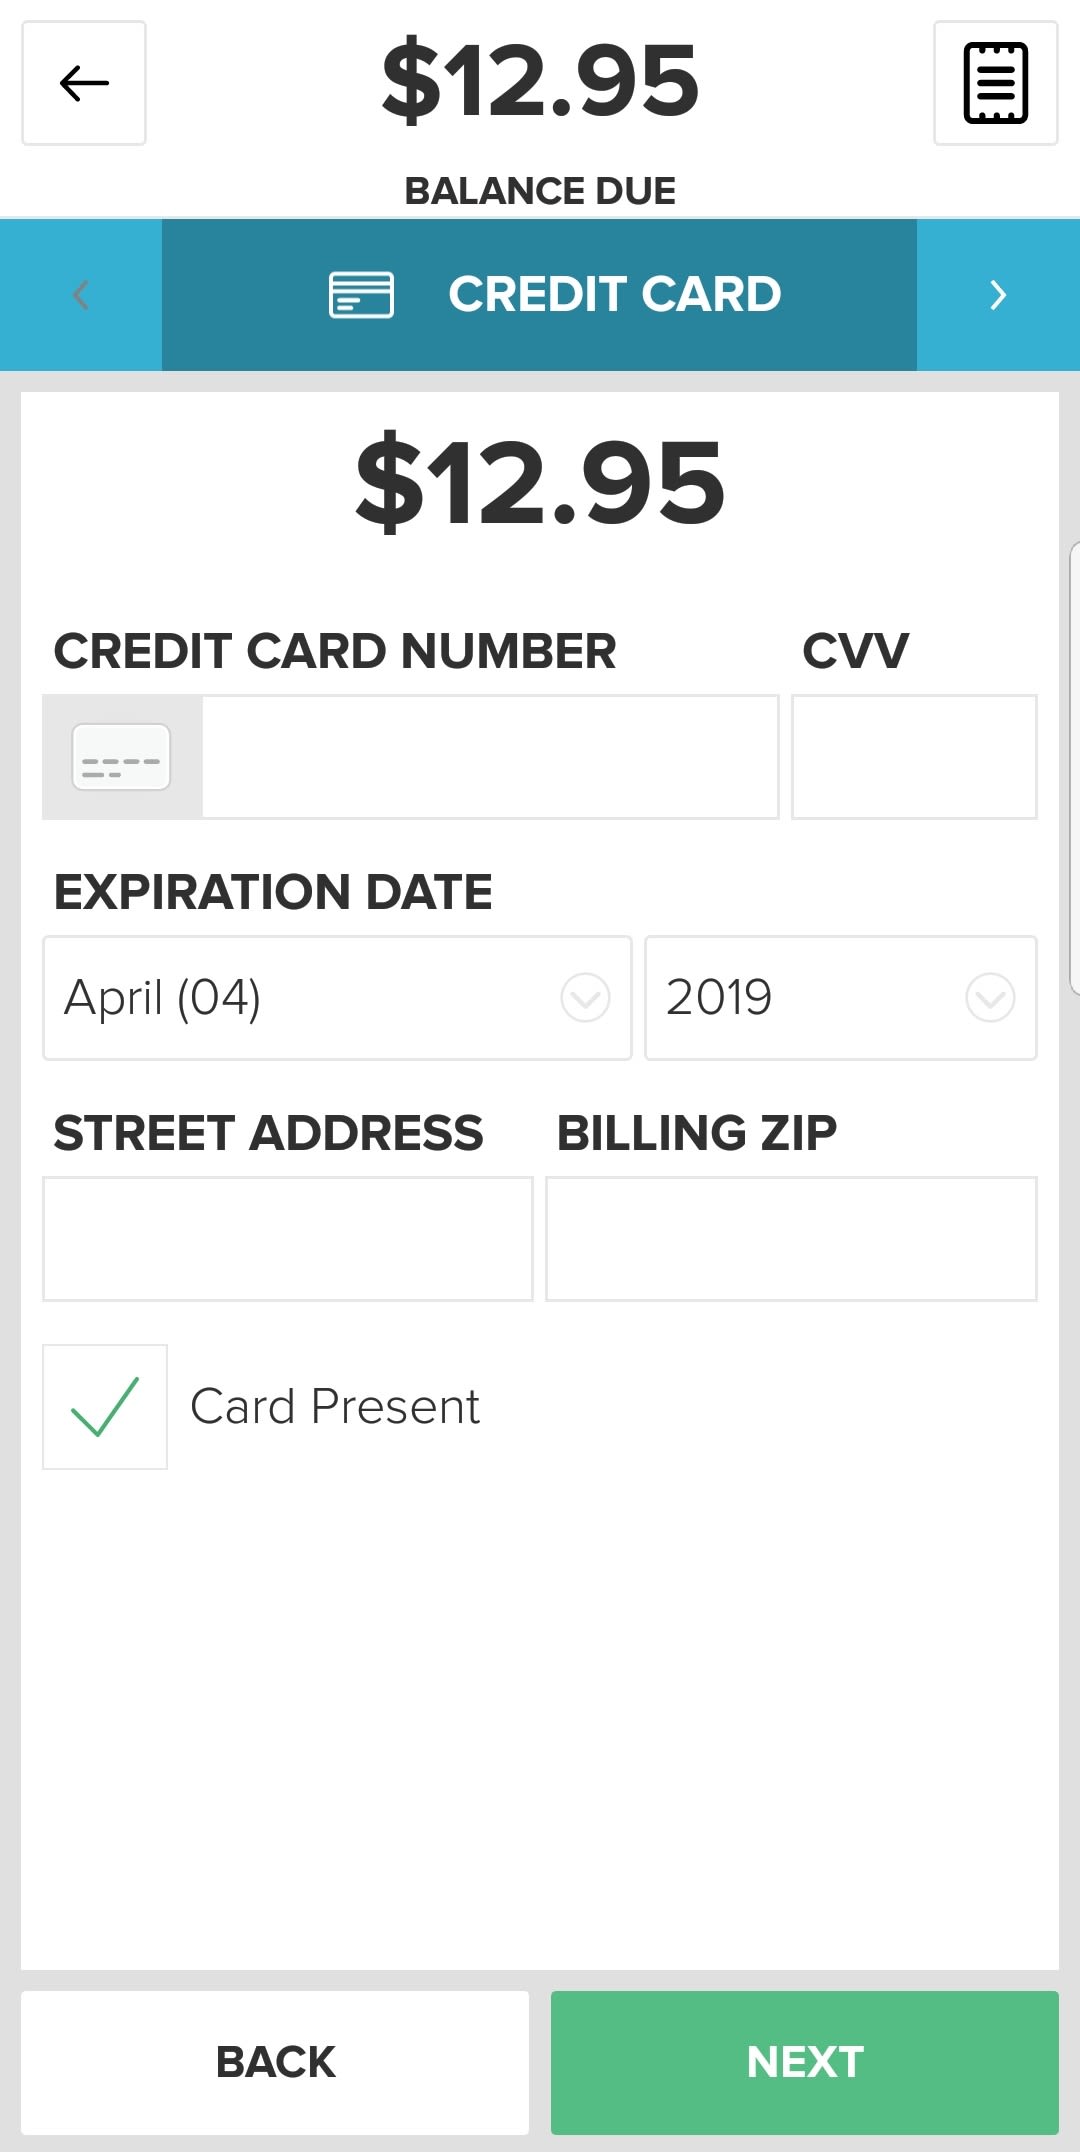
Manual card entry screen
Gratuities
You can accept tips with the Vital Mobile, but they must be added at the time of checkout. You cannot manually adjust tips later. That means that restaurants that prefer to print receipts that allow a customer to write down a tip and then adjust the transaction total later will not be able to use that method with Vital Mobile. Instead, the tip would have to be added and factored in to the transaction when you run the card. This process is common for quick-serve restaurants and takeout.
Payments Limitations
There are some functions that Vital supports on other devices, but not the Mobile. That includes the ability to split payments or split orders out by item and provide partial refunds / refunds by item. If you need those functions, you’ll want to purchase the Vital POS systems or the handheld Vital Plus X5 instead.
You can also compare the Vital Mobile to other smartphone credit card readers. Check out CardFellow’s credit card reader directory for full reviews and details of other popular options.
Vital Mobile Card Readers
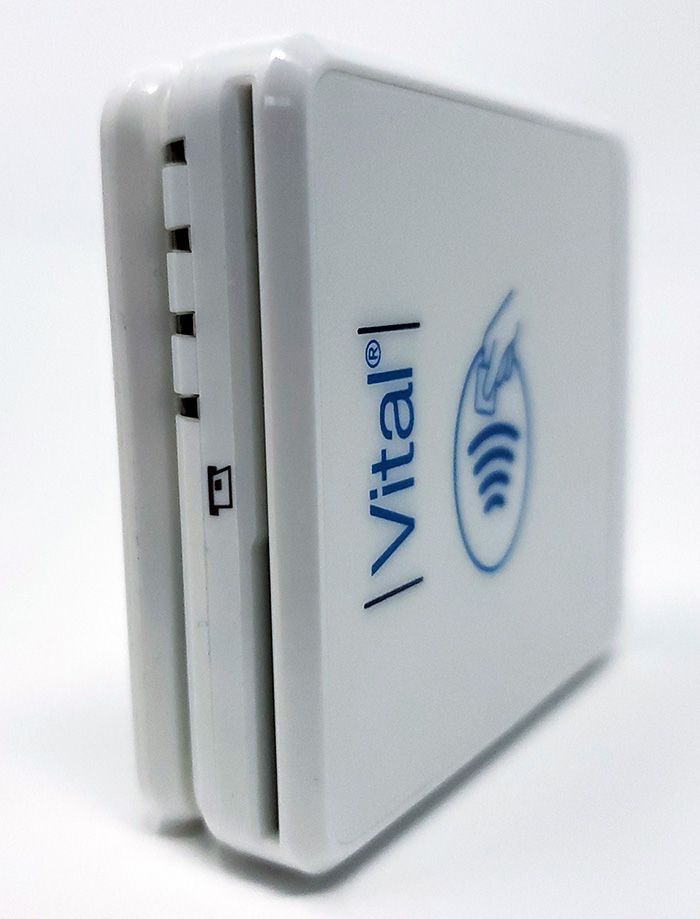
There are two Vital Mobile card readers: the C3 (left) and C4.

Vital Mobile card readers
Both readers connect via Bluetooth, but the C3 only accepts magstripe and chip cards, while the C4 accepts magstripe, chip, and contactless payments.
I tried the C4 reader. When it arrived, I first had to charge it, which took a few hours. Once charged, pairing the device via Bluetooth was straightforward. I found the C4 to be less clunky than headphone jack card readers, which sometimes wobble or make the phone feel top heavy. Since the C4 isn’t actually attached to the phone, it doesn’t interfere with operation at all.

Vital Mobile reader, in packaging
With the Bluetooth reader paired and ready to go, completing a transaction is simply a matter of going through the checkout steps on the App. I tested an EMV chip card and it went through quickly, with no difficulty reading the card.
The EMV chip slot and the magstripe slot are both along the top of the reader, with the chip slot including a small image showing which direction to insert the card.
Vital Mobile EMV chip slot (front) and magstripe reader slot (back)
Vital Mobile Costs
The Vital Mobile app is free to download, but there’s a monthly software charge for continued use of the app and the Back Office portal. The Vital Mobile monthly software fee starts at $4.99. However, your processor may charge more or less depending on other variables.
Note that there’s a monthly software fee for each Vital device, and those fees stack. So, if you use a Vital Mobile and a Vital Select POS, you’ll have two software fees: one of the Mobile, and one for the Select.
|
|
Vital C3 Reader |
Vital C4 Reader |
|---|---|---|
|
Monthly software fee |
Starts at $4.99/month |
Starts at $4.99/month |
|
Reader cost |
Starts at $60 |
Starts at $110 |
|
NFC capable |
No |
Yes |
The readers themselves are one-time purchases. The Vital C3 reader starts at $60 while the Vital C4 starts at $110.
Vital Mobile Credit Card Processing
As a TSYS device, the Vital Mobile solution requires a merchant account with either TSYS or a TSYS-compatible processing company. Fortunately, there are plenty of options.
CardFellow partners directly with TSYS and with TSYS-compatible processing companies. As a CardFellow member, you can request pricing from processing companies that offer the Vital systems and we’ll help you navigate your options.
Not a CardFellow member yet? It’s free to sign up, and you’ll receive great perks, including:
- Exclusive access to CardFellow member pricing
- CardFellow rate guard to ensure your rates don’t go up
- Independent statement monitoring to spot any overcharges
- No merchant account cancellation fees
CardFellow is not a credit card processor. We’re independent experts that help you choose the right processing solution. Our contracts with processors ensure great deals for members.
Product Features
Selective: TSYS
Smartphone/Tablet
- iOS compatible
- Android Compatible
- EMV capable
- NFC capable
